Strictly speaking, lifestyle practices that keep a person passive, bad dietary choices, and stress contribute to broader hips, a flabby stomach, and an increased incidence of illness. Getting rid of stubborn belly is difficult, thus, Yoga for Belly Fat could help.
Even when someone works out daily and keeps their overall diet balanced, stubborn belly fat is a challenge to lose. Instead of junk food, eat natural foods and engage in regular yoga and exercise to shed your belly fat and obtain a flat tummy.
In addition, it can help you retain your flat tummy by boosting your metabolism. Yoga can relieve tension and enable you to stay flexible. As compared to traditional core exercises, the exercise will engage your abdominal muscles more efficiently. Keep reading to learn about the best yoga poses to develop your abs & for flat belly.
Related Post: Importance of Yoga during Covid-19
5 Effective Poses of Yoga for Belly Fat
1. Naukasana (Pontoon Posture or Boat Pose)

While lying on your back, this exercise will help strengthen your back and leg muscles, resulting in getting rid of the fat around your waist.
How to Perform
- You must lie on your back for this treatment to work. Don’t place your hands or legs in any unusual positions.
- Raise your legs as high as possible, then inhale deeply and hold your legs straight.
- Perform the next steps while keeping your arms extended, and touch your toes. To make a 45-degree angle, you’ll have to rise off the ground to your full height.
- Relax and keep the pose for a short while.
- Return to the starting point.
- Practicing five times should be beneficial.
Benefits of Naukasana
- By practicing Naukasana, abdominal muscles are strengthened.
- It helps to build arm, thigh, and shoulder muscles.
- It is useful in keeping blood sugar in balance.
- While strengthening muscles of the neck, shoulder, and legs, it also reduces pain in the back.
- Naukasana is an excellent approach to burn unwanted tummy fat effectively.
Caution
- Naukasana is contraindicated for anyone with asthma and cardiac conditions.
- You should avoid this yoga stance if you have low blood pressure, severe headache, or migraine.
- People who have illnesses, including chronic sickness or a spinal problem, should avoid this stance.
- Pregnant women and those who have their periods early should stay away from it.
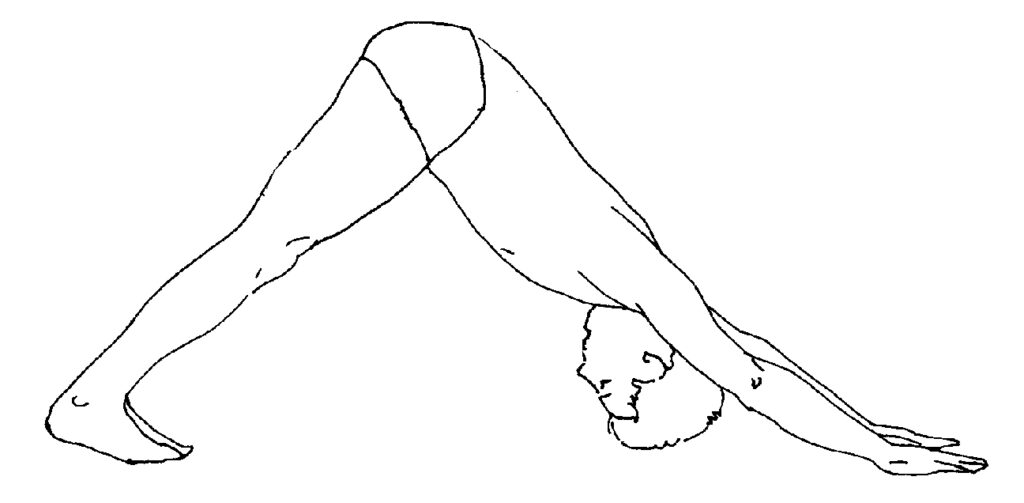
2. Adho Mukha Svanasana (Downward Facing Dog)

If you perform Adho Mukha Svanasana (Downward-Facing Dog), your metabolic rate will be increased, and your abdominal muscles will be continuously engaged.
How to Perform
- It would help if you went into a table formation, and then you can sit.
- Now, take a deep breath and uplift your hips.
- To make an inverted ‘V’ shape, straighten your legs and arms.
- Inhale, and keep your toes pointed forward.
- Your hands should be positioned at a distance of two arm’s-lengths apart.
- Establish a focus on your naval. For a moment, maintain the position and breathe for a while.
- Reorient yourself and return to your original position. This exercise should be repeated five times.
Related Post: 5 Effective Yoga Poses for Hypertension
Benefits of Adho Mukha Svanasana
- Gives good digestion
- Works as a muscle relaxant reduce menstruation and menopausal discomfort and provide relief for lower back pain.
- Develops the upper body, lower body, and core.
- It helps you stay focused.
- Developing self-discipline is an advantage.
- The ability to spark the mind.
Caution
- Proper training and medical attention should be sought before attempting this asana.
- If you have pain in your lower back, you should avoid practicing this asana.
- For pregnant women, this asana should be practiced with caution. To prevent any confusion, it is advisable to talk to your doctor first.
3. Pavanamukthasana (Wind Easing Posture)

This yoga stance will target your abdomen while relieving lower back pain.
A side benefit of practicing Pavanamukthasana is the increased hip and thigh tone. In addition, it aids digestion and increases metabolism.
How to Perform
- To effectively stretch your arms out to the side, lie on your back with your arms positioned beside your sides.
- Stretch out your legs to loosen up.
- To raise your arms, bow your knees while inhaling.
- Use your hands to keep your bent knees in place and apply pressure on your stomach.
- Hold the position for three minutes and breathe deeply.
- Release your knees now.
- Return to the starting point. Perform this exercise five times.
Benefits of Pawanmuktasana
- Abdominal muscles are strengthened, and fat on the belly is decreased.
- It has a direct impact on the intestinal tract and other organs.
- It is effective in Weight loss.
- Stimulates digestion, soothes constipation, and calms the digestive tract.
Related Post: Benefits of Surya Namaskar (Poses & Mantras) for Weight Loss
Caution
- Some of the health issues you should be aware of while you execute this yoga posture include hypertension, hyperacidity, hernia, back and neck problems, and a slipped disc.
- During pregnancy and when menstruating, women are advised to avoid performing Pawanmuktasana.
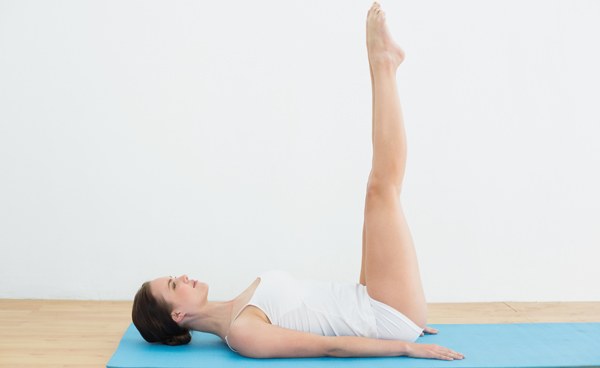
4. Uttanpadasana (Raised Foot Pose)– Yoga for Belly Fat

You can reduce the fat around your belly by practicing Uttanpadasana, which includes getting up from a sitting position while moving both legs simultaneously.
One of the most efficient yoga poses to reduce belly fat is this one.
How to Perform
- Lie down on your back to get your heartbeat recorded.
- Keep your legs and hands straight, and keep your fingers off your sides.
- Before exercising, spend some time breathing deeply and stretching your body. Raise your legs, and angle your legs toward the floor at a 45-degree angle.
- Lift your legs to a 90-degree angle to achieve the pose.
- This exercise can be done using the wall to aid you.
- First, rest in place for 30 seconds. Then, return to your starting position.
- Repeat the sequence ten times.
Benefits of Uttanpadasana
- It is a great aid for digestion, like the issues mentioned above of acidity, indigestion, and constipation
- It aids the organs of the abdomen.
- Benefits include back and hip, and thigh strengthening.
- It will help to shed pounds.
- Also recommended for people with diabetes.
Caution
- In the first several months of pregnancy, women should avoid Uttanasana. Do not practice this asana during the third trimester unless you consult your doctor. One can use the wall for practice.
- This pose is not suitable for high blood pressure and a slipped disc, ulcer, or abdominal surgery.
- Do not practice during menstruating.
Related Post: 7 Effective Tips to Lose Belly Fat
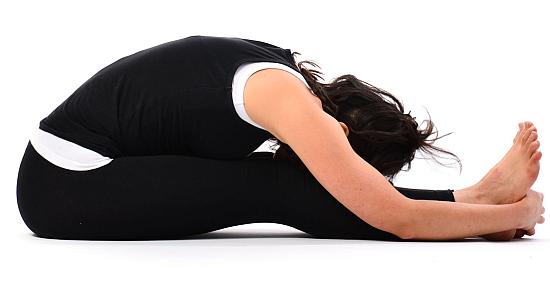
5. Paschimottanasana (Seated Forward Bend)

In addition to helping you lose weight in your midsection, Paschimottanasana (Folded One-Leg Staff Pose) can also improve your menstrual cycle, ease stress, and treat digestive ailments.
How to Perform
- Stretch your legs in front of you and sit on the floor.
- In addition to this, keep your spine straight and engage your stomach.
- Toes should be pointed upwards.
- Bend your knees, keep your palms on the floor, and extend your legs out in front of you so that your toes nearly touch the floor.
- Stretch a little longer and hold the position for a moment.
- Make your way back to your initial location while keeping your hands and arms in place for approximately three minutes.
- You must repeat it ten times.
Benefits of Paschimottanasana
- It provides relief for spinal compression.
- Useful for people with diabetes.
- Spinal elasticity is developed and enhanced through toning and stretching.
- It melts fat in your abdomen
- Beneficial in the treatment of menstrual issues
- Develop a thoughtful temperament.
Caution
- You may have slipped disc
- Try sitting on a folded blanket to improve flexibility, in case your hamstrings are cramped.
- If you are more than two months pregnant, it is probably not good to perform this asana.
- If you have Asthma, Diarrhea, Back injury, or an abdominal ulcer, don’t practice Paschimottanasana.
Related Post: 10 Most Effective Exercises to Lose Belly Fat at Home
Conclusion– Yoga for Belly Fat
Doing these yoga workouts can help you get a toned, flat tummy and better lifestyle overall. For the best results, use all six yoga postures in your routine, and be sure to maintain a consistent workout schedule to see improvements.
Be patient, and keep an eye on the overall improvements in your overall physical fitness and your overall productivity.